Monday, April 1, 2019

How to Screen Record in Galaxy S10, S10 Plus, and S10e


With One UI, Samsung took some really big (and really good) steps towards making its Android skin much better than it historically has been, and while One UI brings a bunch of awesome features, there is one particular thing that bugs me, and that’s the fact that you can’t record your phone’s screen as effortlessly as you might expect.
There Actually Is a Screen Recorder, But You Can’t Really Use It

So, when you launch a game on your One UI powered smartphone, the navigation bar has a neat little Game Tools icon tucked in which, among other things, lets you record your gameplay along with internal sounds, and that’s pretty cool. However, there’s no way to use this screen recorder in any other app, or as a standalone app, and that pretty much sucks. Fortunately, there’s a way. Kind of.

Recommended for you:Gihosoft Free Android Data Recovery is a powerful Samsung data recovery app. With it, users can recover deleted or lost contacts, call logs, messages, photos, videos, audios, WhatsApp and Viber chat history, etc., from Samsung Galaxy S10/S10+, Samsung Galaxy Note 9, Samsung Galaxy S9/S9+, Samsung Galaxy S8/S8+ as well as other Android phones quickly. What’s more, this Samsung data recovery tool is highly reliable and extremely easy to use.
Use Screen Recorder Outside of Games in One UI

If you’re fretting about not being able to use the built-in screen recorder in places other than games, worry not. I have a solution of sorts. Here’s how you can use the screen recorder in other apps as well:

Note: I’ve tested this on the Galaxy S10 and the Galaxy S10+, but I’m fairly certain it’ll work on any One UI powered phone.


Open the ‘Game Launcher‘ app on your smartphone, and tap on the three dot menubutton.


Tap on ‘Add Apps‘, and add the apps you wish to screen record. I’m adding the Beebom app (Free).


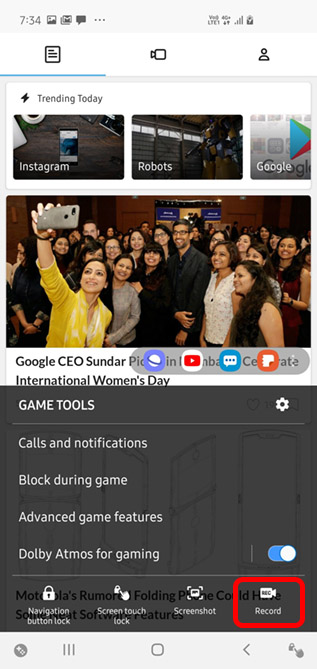
Now, just launch the Beebom app (from the Game Launcher, or even from the app drawer), and you’ll see the ‘Game Tools’ icon in the navigation bar.


Also Read: How to Completely Disable Bixby on Samsung Galaxy S10/S9/S8


Tap on this icon, and then tap on ‘Record.’


This will start recording your entire screen. However, do note that you might have to enable the system sounds recording capabilities manually, and maybe even change the resolution. Here’s how you can do that:


Launch any game, or app that you’ve added in the Game Launcher, and tap on the ‘Game Tools‘ icon.


In the overlay that pops up, tap on the Settings icon, and then tap on ‘Record.’


Also Read: How to Transfer Data from Samsung to Samsung Galaxy S10/S10+/Fold


Now, change the ‘Audio Source’ to ‘Game’ instead of microphone, and also, set the resolution to your preferred value.


That’s it, now you can use the record button in any app added to the Game Launcher, and you’ll be able to record the screen along with the internal audio on your phone. It’s pretty neat.

However, there’s a caveat. Since the recorder is only available to apps added in the Game Launcher, the moment you exit the app, the recording will automatically be stopped. It will get saved though, so don’t worry about that.

See Also: Download Latest Samsung USB Drivers for Mobile Phones on Windows
Use the One UI Screen Recorder

So far, this is the only way I was able to figure out for using the built-in screen recorder in regular apps. I even tried using Nova Launcher activities, but that didn’t work out for me. I’ll definitely keep trying to figure out a better way to do this, and if you’re aware of any way to use the built-in screen recorder in apps other than games, let me know by dropping a comment below and I’ll surely check it out.Also Read:jihosoft Free iPhone Data Recovery

Sponsor ads:

Gihosoft Free iPhone Data Recovery:https://www.gihosoft.com/iphone-data-recovery-free.html

Gihosoft iPhone Data Recovery Free

Free iPhone Data Recovery Software for Windows/Mac

Recover up to 12+ types of files, including contacts, SMS, photos, WhatsApp, Viber, notes, etc.

Restore lost data from iOS devices directly or from iTunes and iCloud backup

Recover iPhone data lost due to iOS upgrade/jailbreak, accidental deletion, device lost or broken

Support all the latest iPhone, iPad and iPod Touch

Both Free and Pro version.

If you lost data after you updated to a new iPhone, you can always use Gihosoft iPhone Data Recovery to get the data back from the old iPhone or backup.You may also like: iphonerecovery.com

Also Read:Update Android

Also Read:Top 8 Best Alternative Websites to TamilGun in 2019

Also Read:Free Download FRP Bypass APK for Android 2019

Also Read:Best 10 Movie4k Alternative Websites for Movie Streaming 2019

Also Read:Top 32 Best Proxy and Mirror Sites to Unblock Fmovies 2019

Also Read:Best Torrent Search Engine Sites to Find Your Favorite Torrents 2019


Thursday, March 7, 2019

How to Wipe a Locked iPad with Apple ID


How to Wipe a Locked iPad with Apple ID

You can wipe your locked iPad without passcode using iCloud’s Find My iPad feature. This method takes too long to complete and only works for those who have enabled this feature on their iPhone before now. Besides, you need to ensure your iPhone is connected to internet.

Step 1. Use your computer to log in to iCloud.com/find. Sign into the service using your Apple ID and password.

Step 2. Find and choose “Find iPhone”.

Step 3. Click on the option “All Devices”, if Find My iPad is enabled in your iPhone, your iPad will be showing on this page.

Step 4. Choose “Erase iPad” option to delete/wipe all the data on your iPad, and open your iPad. Afterward, iCloud will restore your iPad data.


How to Wipe A Locked iPad in Recovery Mode

If you’ve never synced your iPad on iTunes, then you can use Recovery mode to wipe your iPad. However, this service only works when Find My iPhone is not enabled on the iPad.

Step 1. Connect your iPad to your PC using a USB cable. Download, install and launch iTunes on your PC. If you don’t have a PC, borrow from a friend.

Step 2. Force restart your iPad: Press and hold both the Home and Top (or Side) buttons simultaneously. Keep holding the two buttons until you see the recovery mode screen.

Step 3. iTunes will give you 3 options: Cancel, Restore, or Update. Choose “Restore”.

Step 4. Wait for the process to finish, then set up your iPad.


iMyFone LockWiper remains the ultimate solution to wiping a locked iPad completely. Your iPad screen related issues will be permanently solved with LockWiper. Download this software now to unlock your iPhone.Also Read:jihosoft Free iPhone Data Recovery
Sponsor ads:

Gihosoft Free iPhone Data Recovery:https://www.gihosoft.com/iphone-data-recovery-free.html

Gihosoft iPhone Data Recovery Free

Free iPhone Data Recovery Software for Windows/Mac

Recover up to 12+ types of files, including contacts, SMS, photos, WhatsApp, Viber, notes, etc.

Restore lost data from iOS devices directly or from iTunes and iCloud backup

Recover iPhone data lost due to iOS upgrade/jailbreak, accidental deletion, device lost or broken

Support all the latest iPhone, iPad and iPod Touch

Both Free and Pro version.

If you lost data after you updated to a new iPhone, you can always use Gihosoft iPhone Data Recovery to get the data back from the old iPhone or backup.You may also like: iphonerecovery.com

If you use android phones, please choose Gihosoft Android Data Recovery.

With Gihosoft Android Data Recovery, no longer afraid of data loss!

Must read:Youtube video downloader for pc

Gihosoft RePicvid Free Photo Recovery Software provides a free photo recovery software for windows to help users recover the deleted or lost photo for free.


Jihosoft Android Data Recovery: the best Android Data Recovery software for Windows and Mac to recover deleted contacts, messages, photos, videos, WhatsApp and etc from Android devices.Tips:How to transfer messages from iPhone to iPhone

Monday, March 4, 2019

Solutions for iTunes Error 42408


Solutions for iTunes Error 42408

Following are some other solutions you can try:
1.Restart Your PC/Mac

Restarting your PC/Mac is likely to solve the issue because many users have reported that they were able to get rid of the error by simply restarting their computer. So, this simple solution is certainly worth a try.
2.Turn Off Automatic Syncing

Turning off automatic syncing feature of iTunes is another way to fix the iTunes error 42408.

Follow these instructions:

Step 1: Unplug your iDevice from your computer.

Step 2: On iTunes, navigate to Edit > Preferences > Devices.

Step 3: Now make sure that this option is enabled: “Prevent iPods, iPhones, and iPads from syncing automatically”.


Step 4: After enabling this feature, restart iTunes. The problem should be fixed now.
3.Reset Safari’s Cache

This may seem unrelated but clearing Safari’s cache sometimes fixes iTunes error 42408. So, it is worth a try.

Follow these instructions:

Step 1: Close iTunes if its opened and then launch Safari.

Step 2: From the menu bar of Safari, click on the Empty Cache option.


Step 3: Now close Safari and open iTunes. The problem should be solved after this step.
4.Check Network Connection

Since downloading content via iTunes requires a stable internet connection, it may be possible that the error 42408 is occurring due to a connection problem. So, you should make sure that your internet connection is stable when you are downloading purchased content via iTunes. It would also be a good idea to restart your router before attempting to download.
5.Delete iTunes Preference Files

A problem with iTunes preference files may also cause this error. Deleting your saved iTunes preference files is likely to solve the issue.

Follow these instructions:

Step 1: On your Mac, close iTunes and then navigate to Home Folder > Library > Preferences.

Step 2: Find com.apple.itunes.xxx.plist and delete it.


Step 3: Now launch iTunes and try to download the content. It should get downloaded without any issues.
Conclusion

iTunes error 42408 can be really annoying particularly because it can occur due to several reasons. If you are not sure what reason may be causing this error to occur, then it is recommended that you let iMyFone TunesFix handle the problem and fix it for you automatically. TunesFix is also recommended because it will save your time and effort by fixing the error automatically. And if for some reason TunesFix cannot solve the problem, then you should try the other listed solutions one-by-one. Depending on the reason behind the error, one of these solutions will fix the issue.Sponsor ads:

Gihosoft Free iPhone Data Recovery:https://www.gihosoft.com/iphone-data-recovery-free.html

Gihosoft iPhone Data Recovery Free

Free iPhone Data Recovery Software for Windows/Mac

Recover up to 12+ types of files, including contacts, SMS, photos, WhatsApp, Viber, notes, etc.

Restore lost data from iOS devices directly or from iTunes and iCloud backup

Recover iPhone data lost due to iOS upgrade/jailbreak, accidental deletion, device lost or broken

Support all the latest iPhone, iPad and iPod Touch

Both Free and Pro version.

If you lost data after you updated to a new iPhone, you can always use Gihosoft iPhone Data Recovery to get the data back from the old iPhone or backup.You may also like: iphonerecovery.com

If you use android phones, please choose Gihosoft Android Data Recovery.

With Gihosoft Android Data Recovery, no longer afraid of data loss!

Must read:Youtube video downloader for pc

Gihosoft RePicvid Free Photo Recovery Software provides a free photo recovery software for windows to help users recover the deleted or lost photo for free.

Jihosoft Android Data Recovery: the best Android Data Recovery software for Windows and Mac to recover deleted contacts, messages, photos, videos, WhatsApp and etc from Android devices.Tips:How to transfer messages from iPhone to iPhone

jihosoft Free iPhone Data Recovery

Sunday, March 3, 2019

How to View How Much iCloud Storage Space You Have


iClould is a great way to backup information on your iPhone, and Apple offers it free to everyone. But you might be surprised how quickly your iCloud space can fill up. Keep iCloud backups of all your photos, videos, and text messages, and before you know it you will have no room left. And remember, your storage space is offered per Apple ID, not per device. This means that if you have more than one device saving to iCloud, your storage space will fill up even quicker. So today, we’re going to discuss on how to clear iCloud and free up some much needed space.


Part 1: How to View How Much iCloud Storage Space You Have


Part 2: How to Clear iCloud on iPhone to Free up Space


Part 3: How to Save iPhone Space –Free Clean Up


Part 4: Will iCloud Storage Lead to Privacy Leak?
Part 1.How to View How Much iCloud Storage Space You Have

Before we go erasing a bunch of data, we should first check to see how much space you have left in iCloud - you might not even need to clear iCloud space yet. Here’s how to do it:

Step 1: On your iPhone, go to your Settings option.

Step 2: Click on iCloud

Step 3: Click on Storage


Under the “Storage” heading you will see how much of your space you have used. If you want to learn how this space has been distributed, click on “Manage Storage”.
Part 2. How to Clear iCloud on iPhone to Free up Space

Okay, so your space is almost full and you have decided that you better clean up iCloud a little. Here’s what to do next:
A) Turn off Backup Apps That You Are Not Using

Before actually clearing any of your data, let’s start by turning iCloud off for any apps that you are not using. These apps can often take up unwanted and unneeded storage space, leaving less room for the things that you actually want to keep. Here’s how:

Step 1: On your iPhone, go to your Settings option.

Step 2: Click on “iCloud”

Step 3:Swipe the one’s you don’t want to save into off mode.


B) Delete Old iCloud Backups

When it comes to iCloud, your old backups are probably taking up most of your space. These backups can extend way back in time, to when you owned your first iPhone! Chances are, you don’t need most of these backups, so go ahead and clear iCloud space. Here’s how:

Step 1: On your iPhone, go to your Settings option.

Step 2: Click on “iCloud”.

Step 3: Click on “Manage Storage”

Step 4: Select the device you would like to erase data from.

Step 5: Scroll to the bottom of the new window and click “delete backup”


C) Reduce the Size of Your iCloud Photo Library

In today’s day and age, we are all master photographers, and our phones are our new photo albums. Most of us store photos on our devices that are years old, and many that we have already developed or simply don’t need anymore. And photos are a huge culprit for taking up space on our iCloud. Here’s how to clean up iCloud:

Step 1: Head over to Photos app

Step 2: Tap Photos at the left bottom of your screen

Step 3:Tap Select on the right upper corner, choose one or more photos to delete

Step 4:Then click the icon of Dustbin, and confirm deletion by tapping Delete Photo


D) Delete Files in iCloud Drive

Okay, so now we’ve deleted all of our backups, and we’ve cleared out some unneeded photos. Now it’s time to clean out the rest of our iCloud drive. Here’s how:

Step 1: Launch iCloud Drive from the iOS home screen

Step 2: Click Select and choose files to delete

Step 3: Click Delete and confirm to remove selected files


When you do this, all of the data and files associated with the selected apps will be removed from iCloud, freeing up a great deal of iCloud space.Sponsor ads:

Gihosoft Free iPhone Data Recovery:https://www.gihosoft.com/iphone-data-recovery-free.html

Gihosoft iPhone Data Recovery Free

Free iPhone Data Recovery Software for Windows/Mac

Recover up to 12+ types of files, including contacts, SMS, photos, WhatsApp, Viber, notes, etc.

Restore lost data from iOS devices directly or from iTunes and iCloud backup

Recover iPhone data lost due to iOS upgrade/jailbreak, accidental deletion, device lost or broken

Support all the latest iPhone, iPad and iPod Touch

Both Free and Pro version.

If you lost data after you updated to a new iPhone, you can always use Gihosoft iPhone Data Recovery to get the data back from the old iPhone or backup.You may also like: iphonerecovery.com

If you use android phones, please choose Gihosoft Android Data Recovery.

With Gihosoft Android Data Recovery, no longer afraid of data loss!

Must read:Youtube video downloader for pc

Gihosoft RePicvid Free Photo Recovery Software provides a free photo recovery software for windows to help users recover the deleted or lost photo for free.

Jihosoft Android Data Recovery: the best Android Data Recovery software for Windows and Mac to recover deleted contacts, messages, photos, videos, WhatsApp and etc from Android devices.Tips:How to transfer messages from iPhone to iPhone

jihosoft Free iPhone Data Recovery

Common Ways to Repair "iPhone X/8/8 Plus Error -1 during Restore"


Common Ways to Repair "iPhone X/8/8 Plus Error -1 during Restore"

The following will fix “error 1” when restoring or backing up an iPhone on iTunes.
1 Update iTunes to the Latest Version

iTunes Error 1 may be occurring due to outdated iTunes version, and you can simply fix this issue by updating iTunes through these steps:


Launch your iTunes and click “Help > Check for Updates” (Or click “iTunes > Check for Updates” if you’re using Mac).


Download and install the latest version of iTunes.


2 Allow iTunes in Windows Firewall

“iPhone error (-1) during restore” may be stemming from Windows 10/8/7 Firewall. If Windows Firewall is blocking iTunes from restoring or functioning in Windows, then you’ll need to enable iTunes in Windows Firewall.


Open Control Panel.


Click “System and Security > Windows Firewall > Allow an app or feature through Windows Firewall”.


Click “Change Setting” and check to find iTunes. If iTunes is not in the list, click “Allow another app” to browse and add iTunes to the listed items.


Select “Public” to allow iTunes communicate through the firewall.
Alternative Way to Completely Restore iPhone

Sponsor ads:

Gihosoft Free iPhone Data Recovery:https://www.gihosoft.com/iphone-data-recovery-free.html

Gihosoft iPhone Data Recovery Free

Free iPhone Data Recovery Software for Windows/Mac

Recover up to 12+ types of files, including contacts, SMS, photos, WhatsApp, Viber, notes, etc.

Restore lost data from iOS devices directly or from iTunes and iCloud backup

Recover iPhone data lost due to iOS upgrade/jailbreak, accidental deletion, device lost or broken

Support all the latest iPhone, iPad and iPod Touch

Both Free and Pro version.

If you lost data after you updated to a new iPhone, you can always use Gihosoft iPhone Data Recovery to get the data back from the old iPhone or backup.You may also like: iphonerecovery.com

If you use android phones, please choose Gihosoft Android Data Recovery.

With Gihosoft Android Data Recovery, no longer afraid of data loss!

Must read:Youtube video downloader for pc

Gihosoft RePicvid Free Photo Recovery Software provides a free photo recovery software for windows to help users recover the deleted or lost photo for free.

Jihosoft Android Data Recovery: the best Android Data Recovery software for Windows and Mac to recover deleted contacts, messages, photos, videos, WhatsApp and etc from Android devices.Tips:How to transfer messages from iPhone to iPhone


jihosoft Free iPhone Data Recovery

Friday, March 1, 2019

Apple Music Deleted My Music from iPhone, Re-download Music on iPhone


Apple Music Deleted My Music from iPhone, Re-download Music on iPhone

In the past, when you lose or delete your music by mistake on your iPhone you’d be in serious trouble. Fortunately, Apple now has a feature that allows you re-download all missing or lost music purchased from iTunes for free. This is a free service but it’s only applicable to music purchased from the iTunes store. This feature lets you re-download songs, album covers, albums, etc. directly to your iPhone at zero cost. Follow the steps below to re-download missing music for free:

Step 1. Login with the Apple ID you used for the music purchase on your iPhone. Navigate to "Settings > iTunes & App Store> Apple ID".

Step 2. Click on the iTunes Store app to open it.


Step 3. At the bottom right of the screen, hit the "More" button.

Step 4. Click on "Purchased".


Step 5. Click on "Music".


Step 6. Hit the "Not on This iPhone" toggle.


Step 7. A list of purchases will be displayed. Look for the ones you want to re-download from the list.

Step 8. Click on the download icon (the cloud that has an arrow pointing down) to initiate the download process


Step 9. Once that is done you’ll have your song re-downloaded to your iPhone
Conclusion:

It is really important and highly advisable that you backup your iPhone music at all times. Think of the emotional stress and the pain you’d have to go through losing an enormous amount of music on your iDevice. Something could go wrong at any time, a phone crash, malware infection targeted to erase all your important data, or you could even end up accidentally deleting some of your favorite songs yourself.Sponsor ads:

Gihosoft Free iPhone Data Recovery:https://www.gihosoft.com/iphone-data-recovery-free.html

Gihosoft iPhone Data Recovery Free

Free iPhone Data Recovery Software for Windows/Mac

Recover up to 12+ types of files, including contacts, SMS, photos, WhatsApp, Viber, notes, etc.

Restore lost data from iOS devices directly or from iTunes and iCloud backup

Recover iPhone data lost due to iOS upgrade/jailbreak, accidental deletion, device lost or broken

Support all the latest iPhone, iPad and iPod Touch

Both Free and Pro version.

If you lost data after you updated to a new iPhone, you can always use Gihosoft iPhone Data Recovery to get the data back from the old iPhone or backup.You may also like: iphonerecovery.com

If you use android phones, please choose Gihosoft Android Data Recovery.

With Gihosoft Android Data Recovery, no longer afraid of data loss!

Must read:Youtube video downloader for pc

Gihosoft RePicvid Free Photo Recovery Software provides a free photo recovery software for windows to help users recover the deleted or lost photo for free.

Jihosoft Android Data Recovery: the best Android Data Recovery software for Windows and Mac to recover deleted contacts, messages, photos, videos, WhatsApp and etc from Android devices.Tips:How to transfer messages from iPhone to iPhone

jihosoft Free iPhone Data Recovery

Wednesday, February 27, 2019

Do You Really Need Bonjour? How to Uninstall iTunes Bonjour


Do You Really Need Bonjour? How to Uninstall iTunes Bonjour
Bonjour is a utility program that is integrated into some Apple programs. It is usually used by iTunes to find shared music libraries, AirPort Express devices for streaming music to and to find Apple TVs. Safari also uses Bonjour to find devices advertising web pages on your network.

It is usually installed automatically when you install iTunes and it runs a process that starts up and runs in the background when you start your system. All of this is done in the background and, a lot of the time, you don’t really know that it’s there.
Can I Uninstall Bonjour and Still Use iTunes Normally?

If you ordinarily use any of the services provided by Bonjour, then the apps through which you use those features need Bonjour to work. Removing Bonjour from your device will cause those apps to stop working properly.

But if you don’t do anything of Home Sharing, remote app or syncing to Apple TVs, you can uninstall bonjour. iTunes will remind you once next time you open it and that will be that. It will work fine.

Besides, you can also uninstall Apple Software Update if you don’t want that running. But don’t uninstall Apple Application Support because they are absolutely needed for iTunes to function.


Method 1: How to Manually Uninstall Bonjour iTunes


Method 2: Met Any iTunes Errors? Completely Uninstall iTunes and Reinstall the Latest Version
How to Manually Uninstall Bonjour iTunes

If you have any Apple software on your device, there’s a high probability that you have a Bonjour folder in your program files. It starts up automatically and runs a process named mDNSResponder.exe. This process cannot be stopped by Windows’ task manager. So if you want to get rid of it, you have to remove Bonjour.
Way 1: Uninstall Bonjour from Control Panel

Generally, you can remove Bonjour from your Control Panel. You can ordinarily do this by going to Control Panel and clicking “Programs and Features”. Find the program called “Bonjour” and right click on it to choose “Uninstall”. However, this process may fail to completely remove Bonjour from your device and it may cause operating problems for your iTunes.


Way 2: Remove Bonjour Service and Files

Another method you can use to remove Bonjour from your device as well as its files – mDNSResponder.exe and mdnsNSP.dll – is as follows.

Step 1: On your PC, go to C:\Program Files\Bonjour.

Step 2: Find the "mDNSResponder.exe" file. Right-click on it and choose "Delete".

Step 3: Find the "mdnsNSP.dll" file. Right click on it and choose "Delete".

Note: If you receive a notification "This action can't be completed because the file is open in Bonjour service", restart your computer and try to delete them again.


Step 4: Once done, restart your computer, go to “C:\Program Files\” and delete the Bonjour folder.

This process allows you to fully remove Bonjour from your device. However, it obviously takes time and more than a little bit of knowhow. There’s a better and safer way to remove Bonjour from your device in an even safer, quicker manner.Sponsor ads:

Gihosoft Free iPhone Data Recovery:https://www.gihosoft.com/iphone-data-recovery-free.html

Gihosoft iPhone Data Recovery Free

Free iPhone Data Recovery Software for Windows/Mac

Recover up to 12+ types of files, including contacts, SMS, photos, WhatsApp, Viber, notes, etc.

Restore lost data from iOS devices directly or from iTunes and iCloud backup

Recover iPhone data lost due to iOS upgrade/jailbreak, accidental deletion, device lost or broken

Support all the latest iPhone, iPad and iPod Touch

Both Free and Pro version.

If you lost data after you updated to a new iPhone, you can always use Gihosoft iPhone Data Recovery to get the data back from the old iPhone or backup.You may also like: iphonerecovery.com

If you use android phones, please choose Gihosoft Android Data Recovery.

With Gihosoft Android Data Recovery, no longer afraid of data loss!

Must read:Youtube video downloader for pc

Gihosoft RePicvid Free Photo Recovery Software provides a free photo recovery software for windows to help users recover the deleted or lost photo for free.

Jihosoft Android Data Recovery: the best Android Data Recovery software for Windows and Mac to recover deleted contacts, messages, photos, videos, WhatsApp and etc from Android devices.Tips:How to transfer messages from iPhone to iPhone

jihosoft Free iPhone Data Recovery

How to Screen Record in Galaxy S10, S10 Plus, and S10e

With One UI, Samsung took some really big (and really good) steps towards making its Android skin much better than it historically has been,...